Key Takeaways
- Download VRoid Studio to create a personalized VTuber avatar for free. Your avatar will be your identity, so prioritize creating a great one from the start.
- Customize your avatar’s look using VRoid Studio’s in-depth customization options. Tweak the size, shape, color, and placement of each feature and slowly build your avatar.
- Use the expression editor in VRoid Studio to customize your avatar’s expressions. Work your way through different expressions and adjust the settings to get the desired results.
Becoming a VTuber is a great way to stream on Twitch while also keeping your identity private. Creating and setting up a VTuber avatar can be an intimidating and complicated process, but we’ve got everything you need in this step-by-step walkthrough.
1. Download the VRoid Studio App to Create Your Avatar
The first step in your VTuber journey is to create your avatar. This avatar will become your identity from then on, so making one that you resonate with is very important.
Once your viewers start coming to your stream and connecting with you as a person, they will identify you with your avatar. You can change your avatar later if you want to upgrade or switch it up, but this can be jarring for your viewers, and they won’t recognize your stream from a glance on the Twitch home page. For these reasons, creating a great avatar from the get-go should be a priority.
Thankfully, there are many different programs you can use to make a brilliant VTuber avatar for free. In this case, we will be using VRoid Studio. VRoid Studio is a free program you can download and install on Steam or the App Store, and is one of the best VTubing apps for beginners.
Download: VRoid Studio for Steam | iOS (Free, in-app purchases available)
2. Build Your Avatar’s Look
After downloading and launching VRoid, the first screen you see will give you the option of creating a new custom avatar or selecting one from a few options provided. Making your own is always best since your avatar will become your persona; you don’t want to share that with someone else.
Select Create New to begin crafting your own unique avatar, and choose whether you want to create a Masc or Fem character.
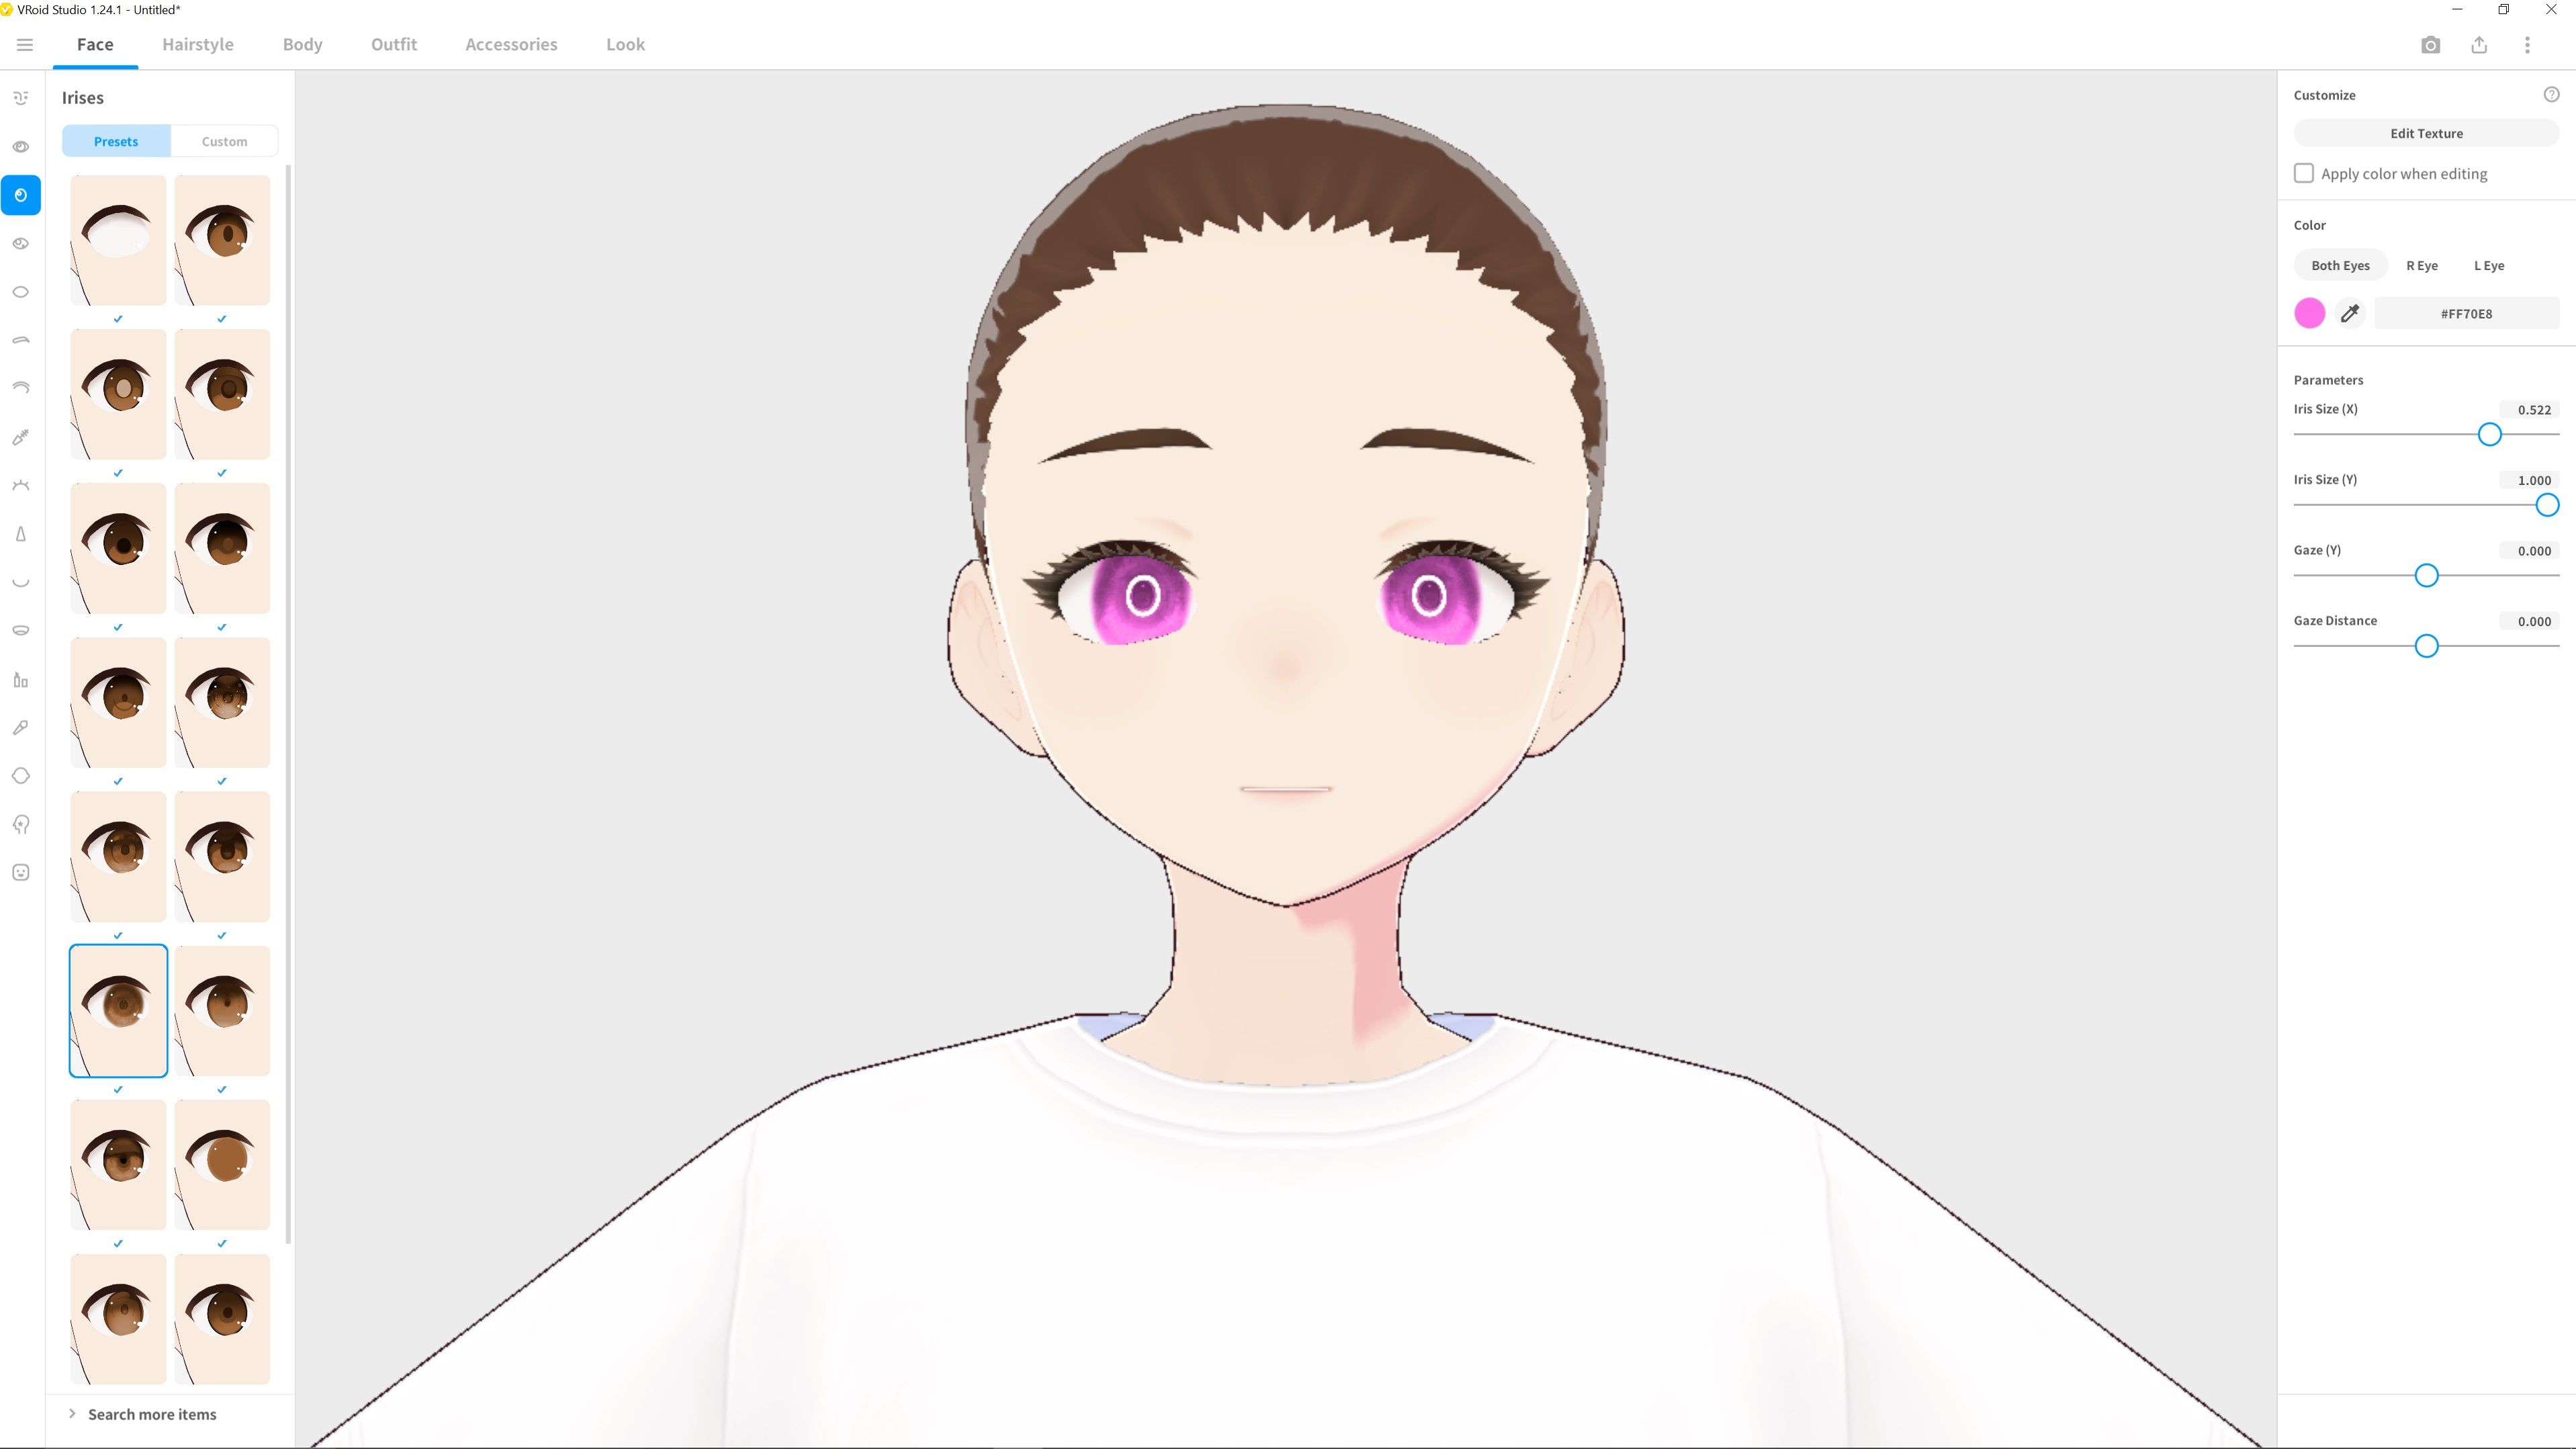
From there, you will see the character creation page. The different parts of your avatar you can customize, such as the face, body, and outfits, are at the top of the screen. When you select one of these categories, more customization options will appear on the left and right.
On the left side of the screen, you will find preset options for things like eye shape, irises, eyebrows, eyelashes, and many more. Once you find something you like, you can move to the menu on the right to customize it even further.
The customization options on the right are extremely in-depth, allowing you to tweak the size, shape, color, and placement of each of your avatar’s features. Work your way through each of the categories along the top of the screen, and slowly build your avatar.
3. Customize Your Avatar’s Expressions
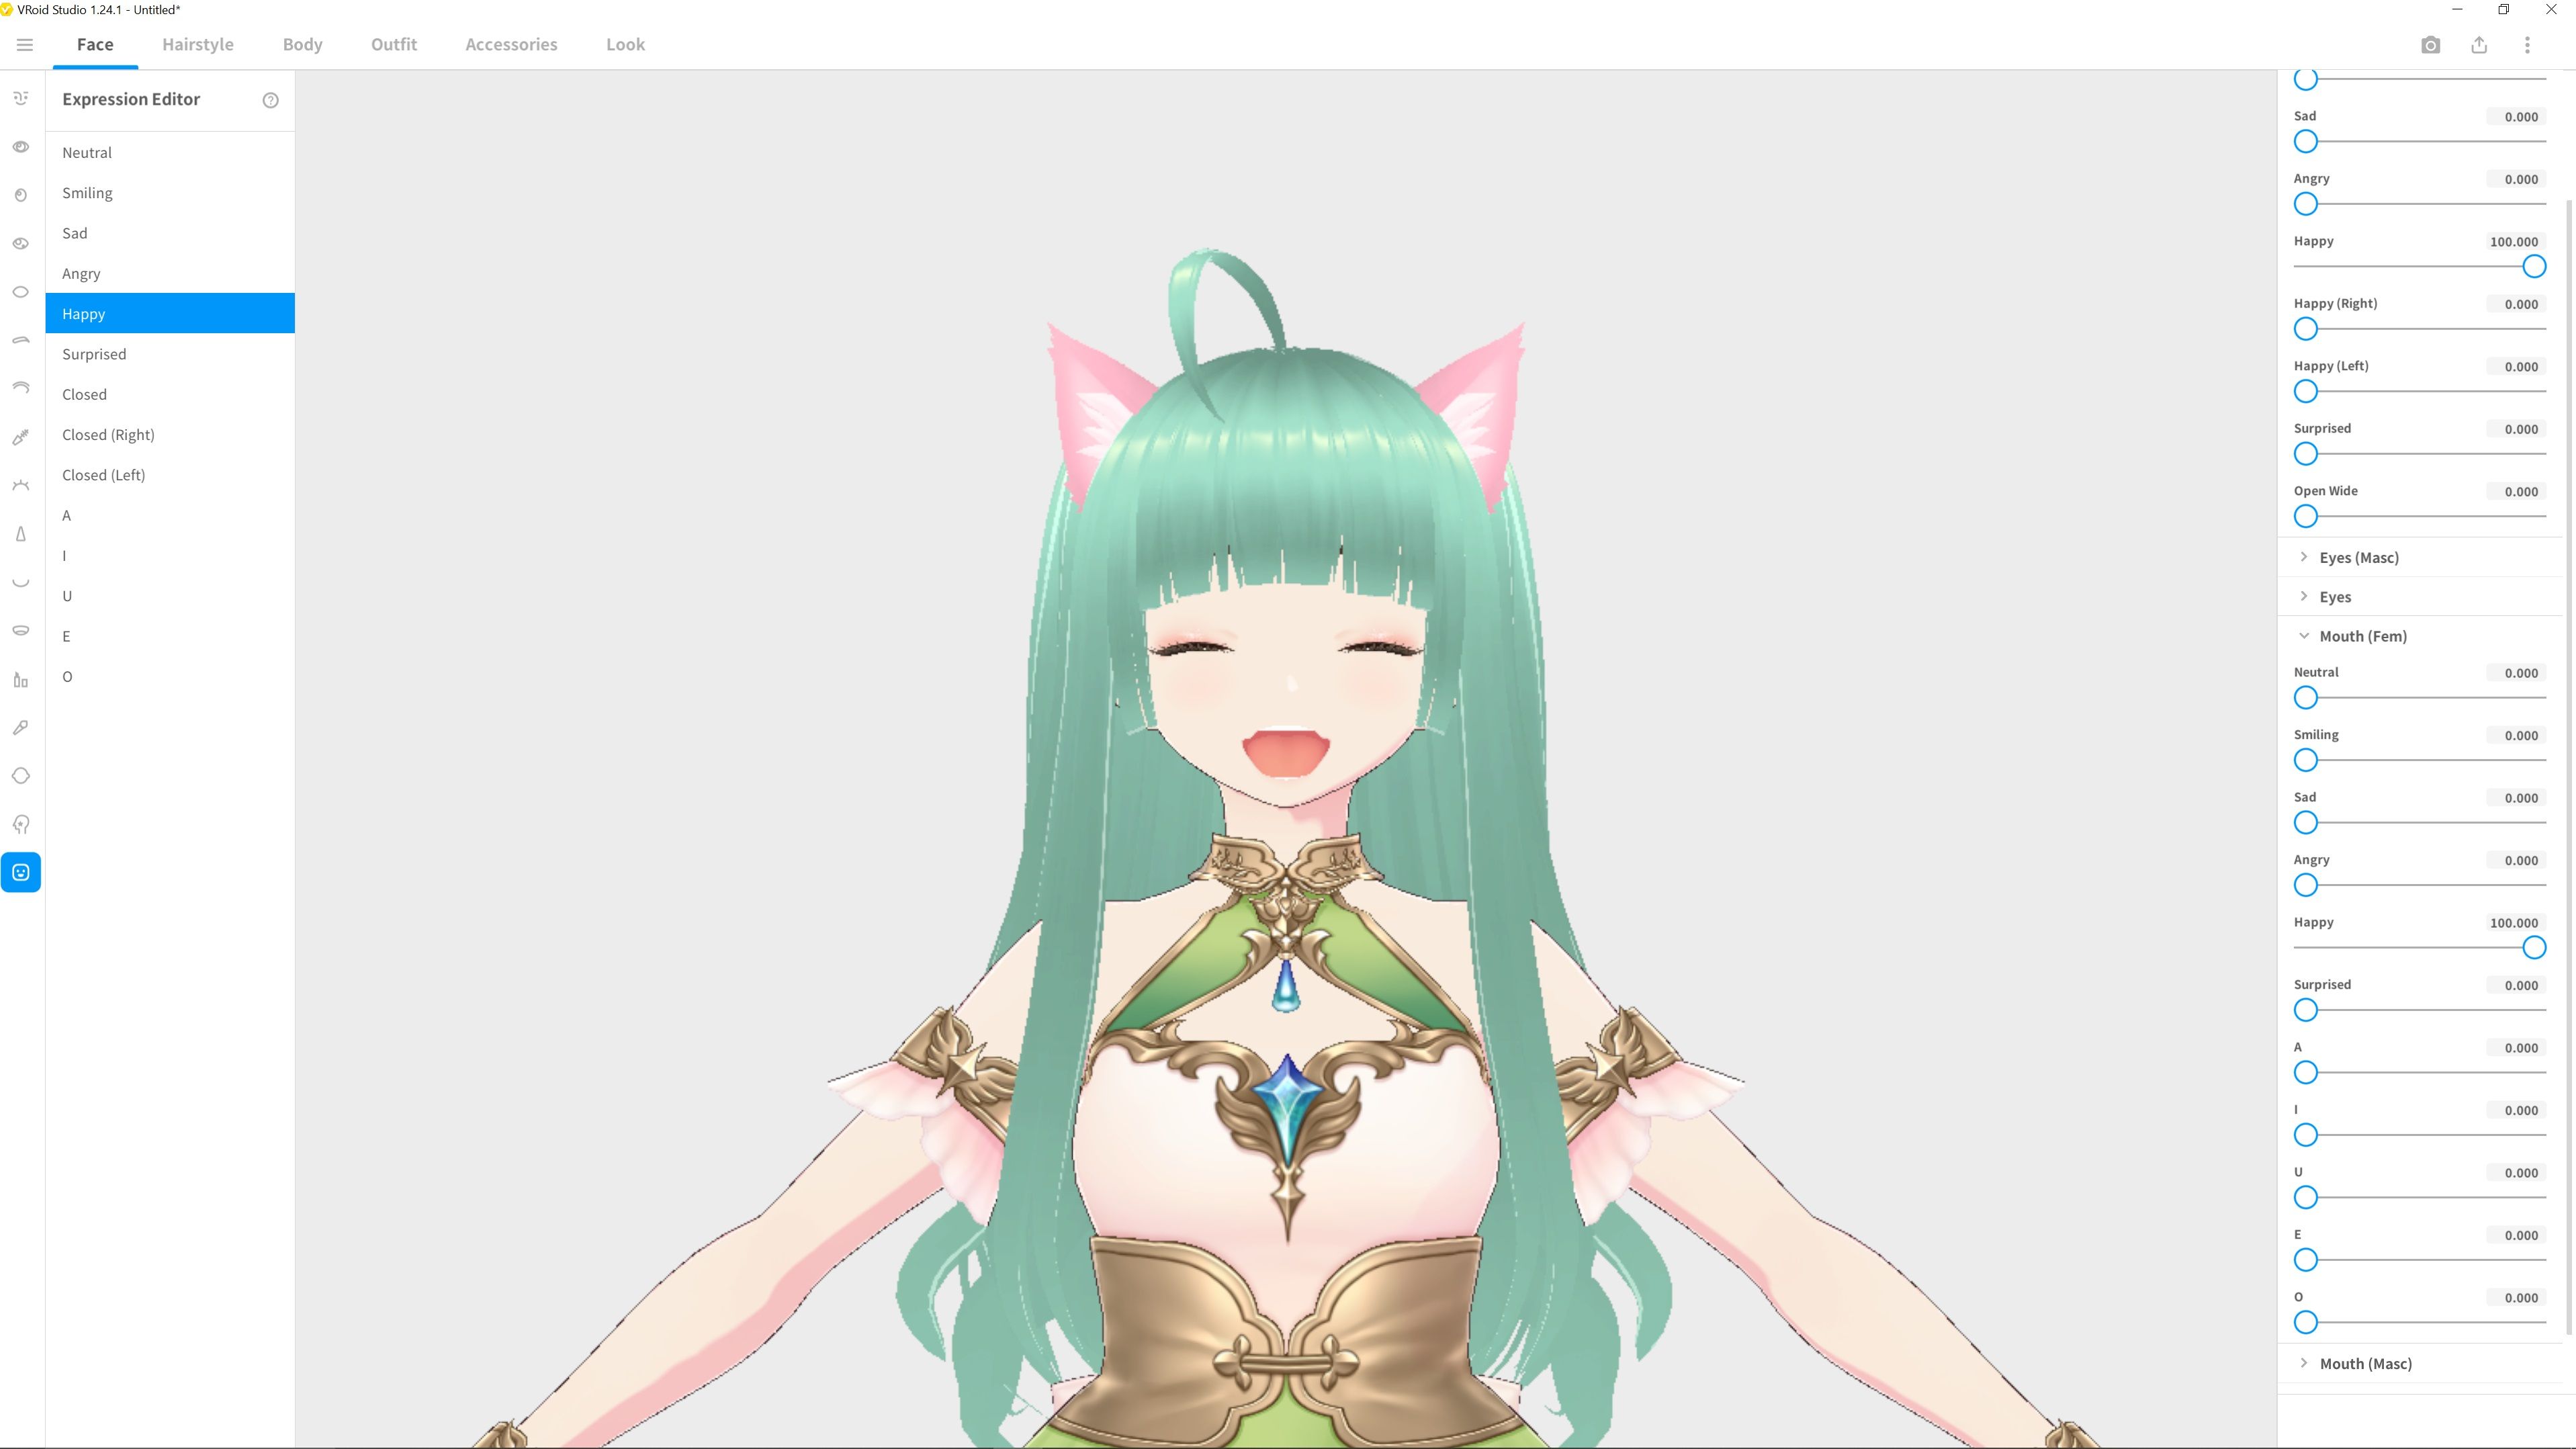
Once you are happy with your character, select the Face tab from the top and hit the icon at the very bottom of the left-side panel to open the Expression Editor.
Work your way through the expressions on the left, and tweak the settings on the right to get the results you want.
4. Export Your Avatar
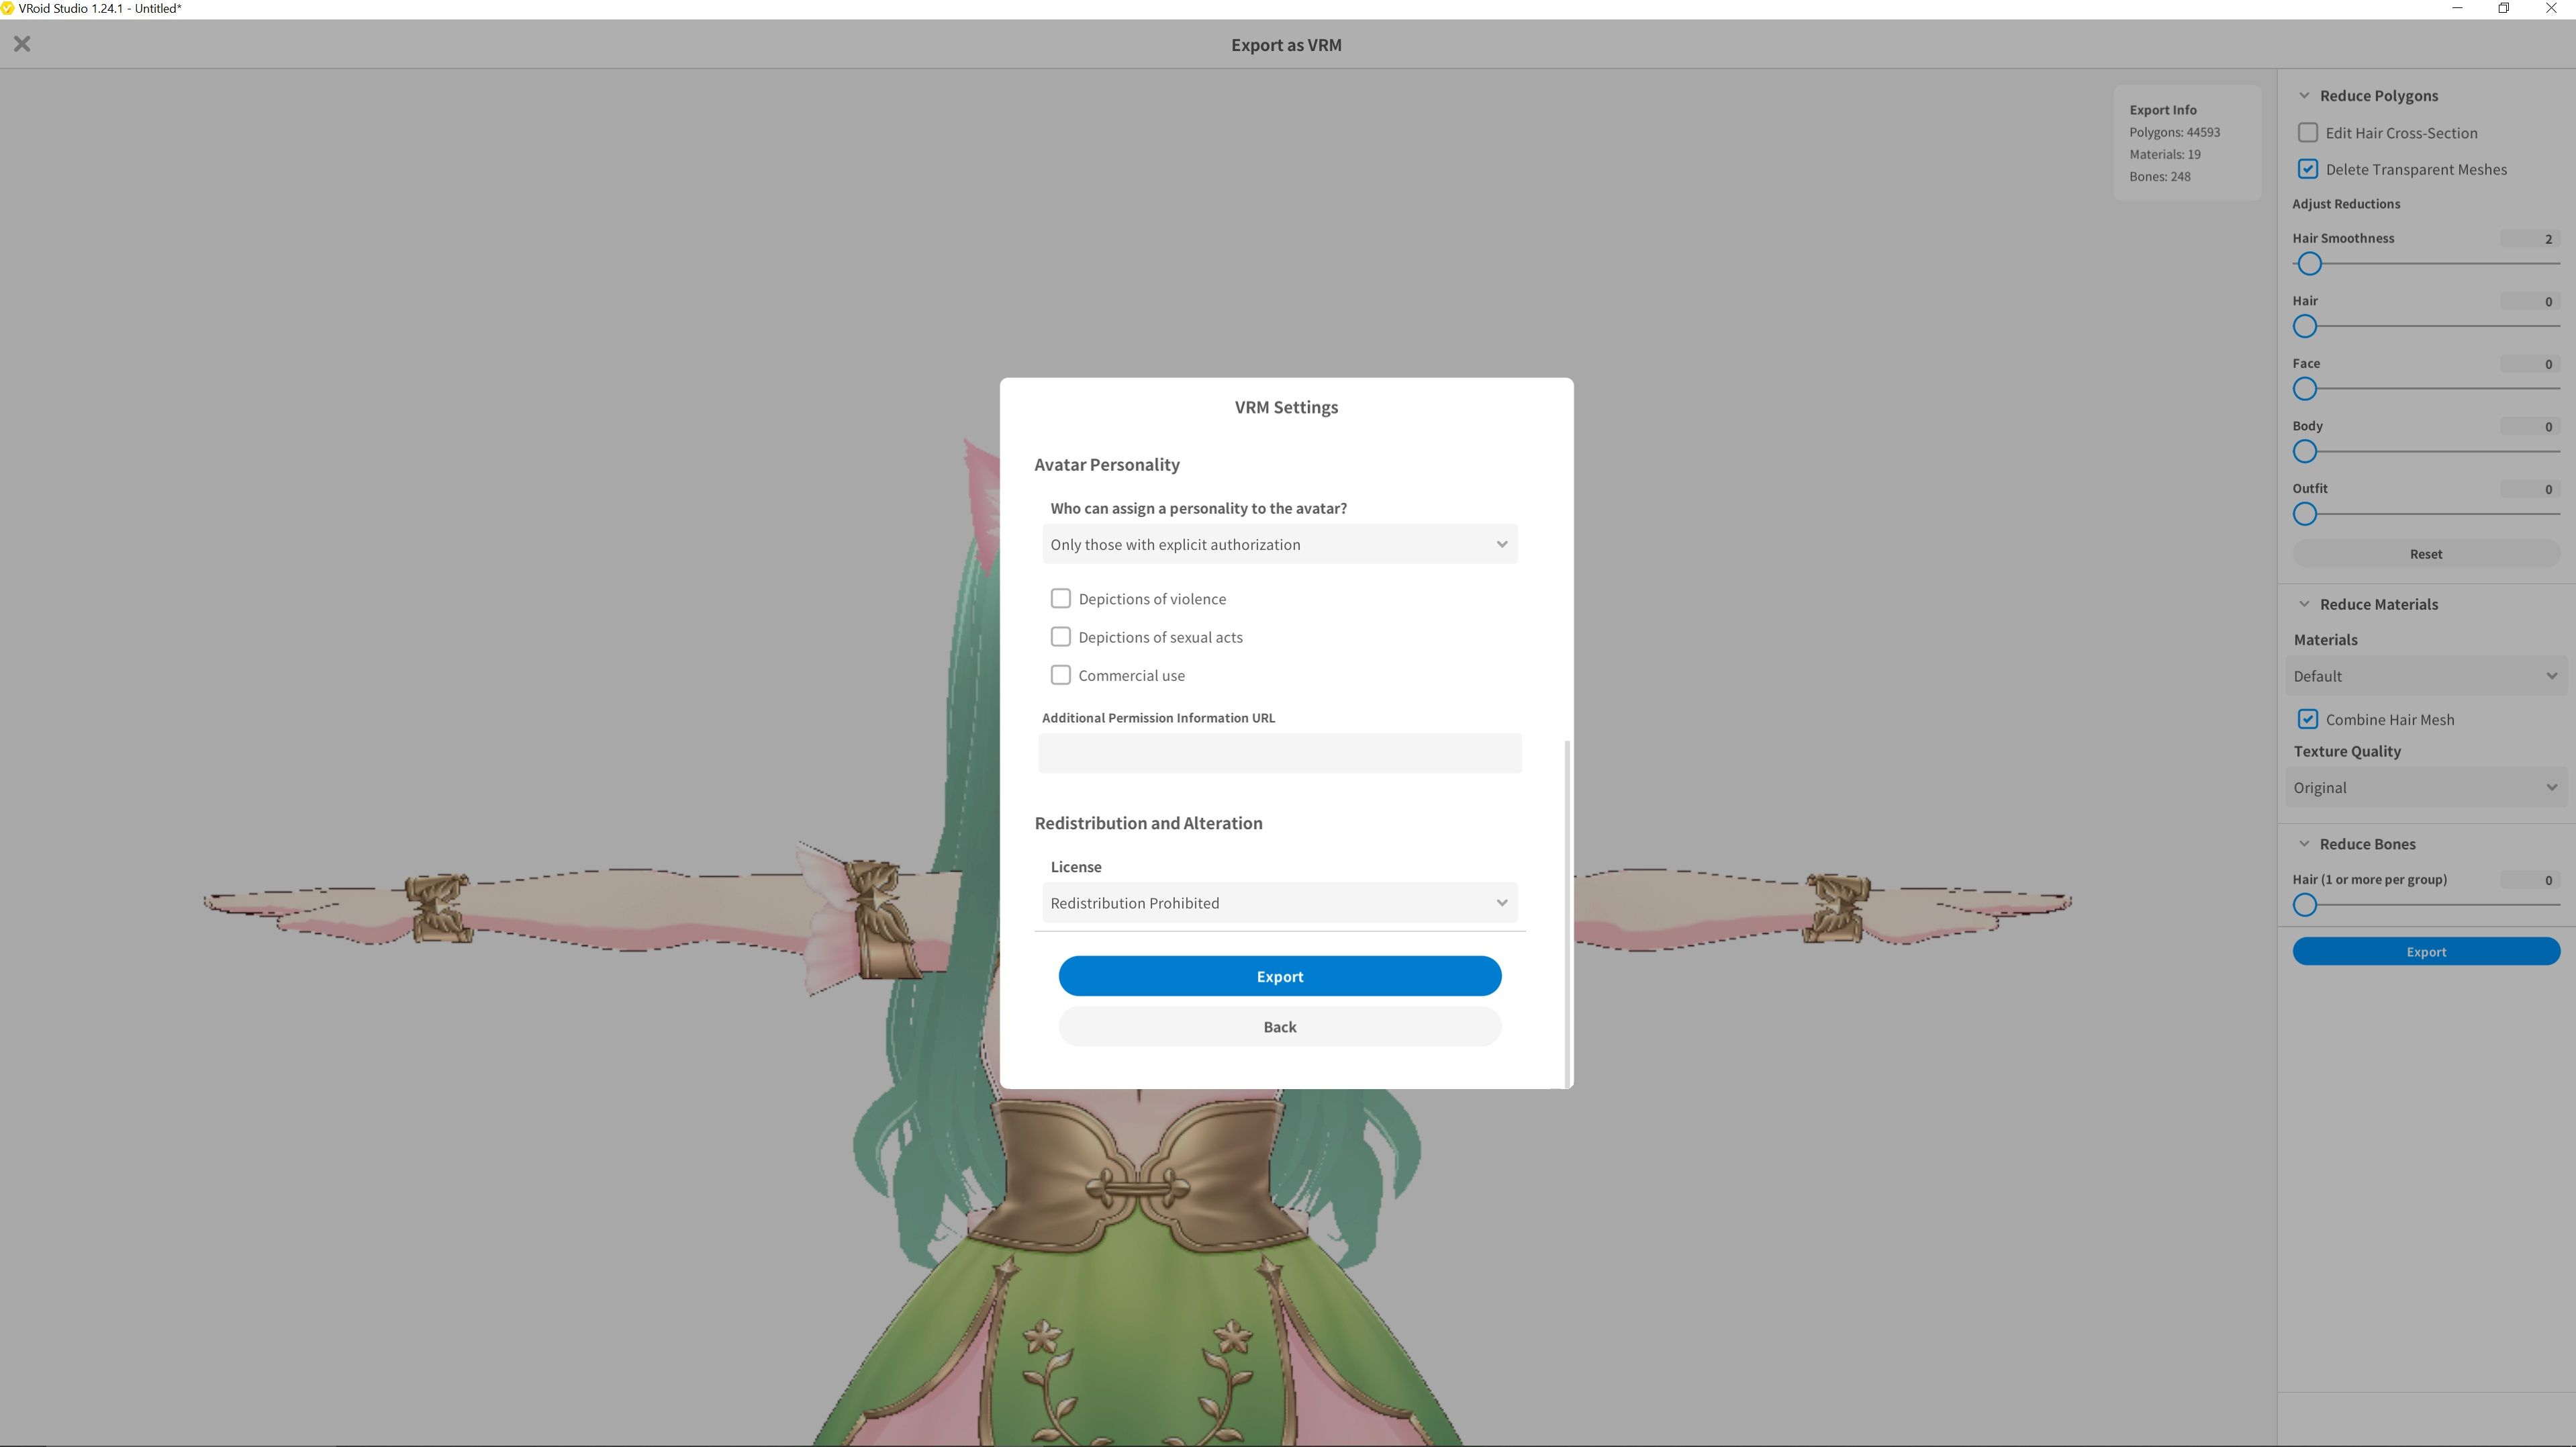
Once you’re happy with your avatar and its expressions, select the Share icon in the top right-hand corner of the screen and hit Export.
Before you can download your avatar, you will have to outline your terms of use. This is where you make it clear who can use or distribute your avatar, and in what way. If you want to make sure you’re the only one who can use your avatar, select Redistribution Prohibited.
Select the file type you’d like to use—VRM0.0 and VRM1.0 are good options—and hit Export to save your completed avatar.
5. Add Your VTuber Avatar to Animaze
Animaze is the software that brings your avatar to life by connecting it to your camera and allowing your character to mimic your movements. This is the main difference between creating a VTuber avatar and creating a PNGTuber avatar. If you don’t have a camera, you won’t be able to effectively create a VTuber avatar. You can still live out your streaming dreams, however, by becoming a PNGTuber instead.
Animaze is free to download on Steam, but it does have a paid version. Paying for Animaze removes the watermarks from your VTuber avatar and gives you access to more features, but we will show you how to remove the watermarks, so you can use and enjoy Animaze for free.
Download: Animaze for Steam (Free, in-app purchases available)
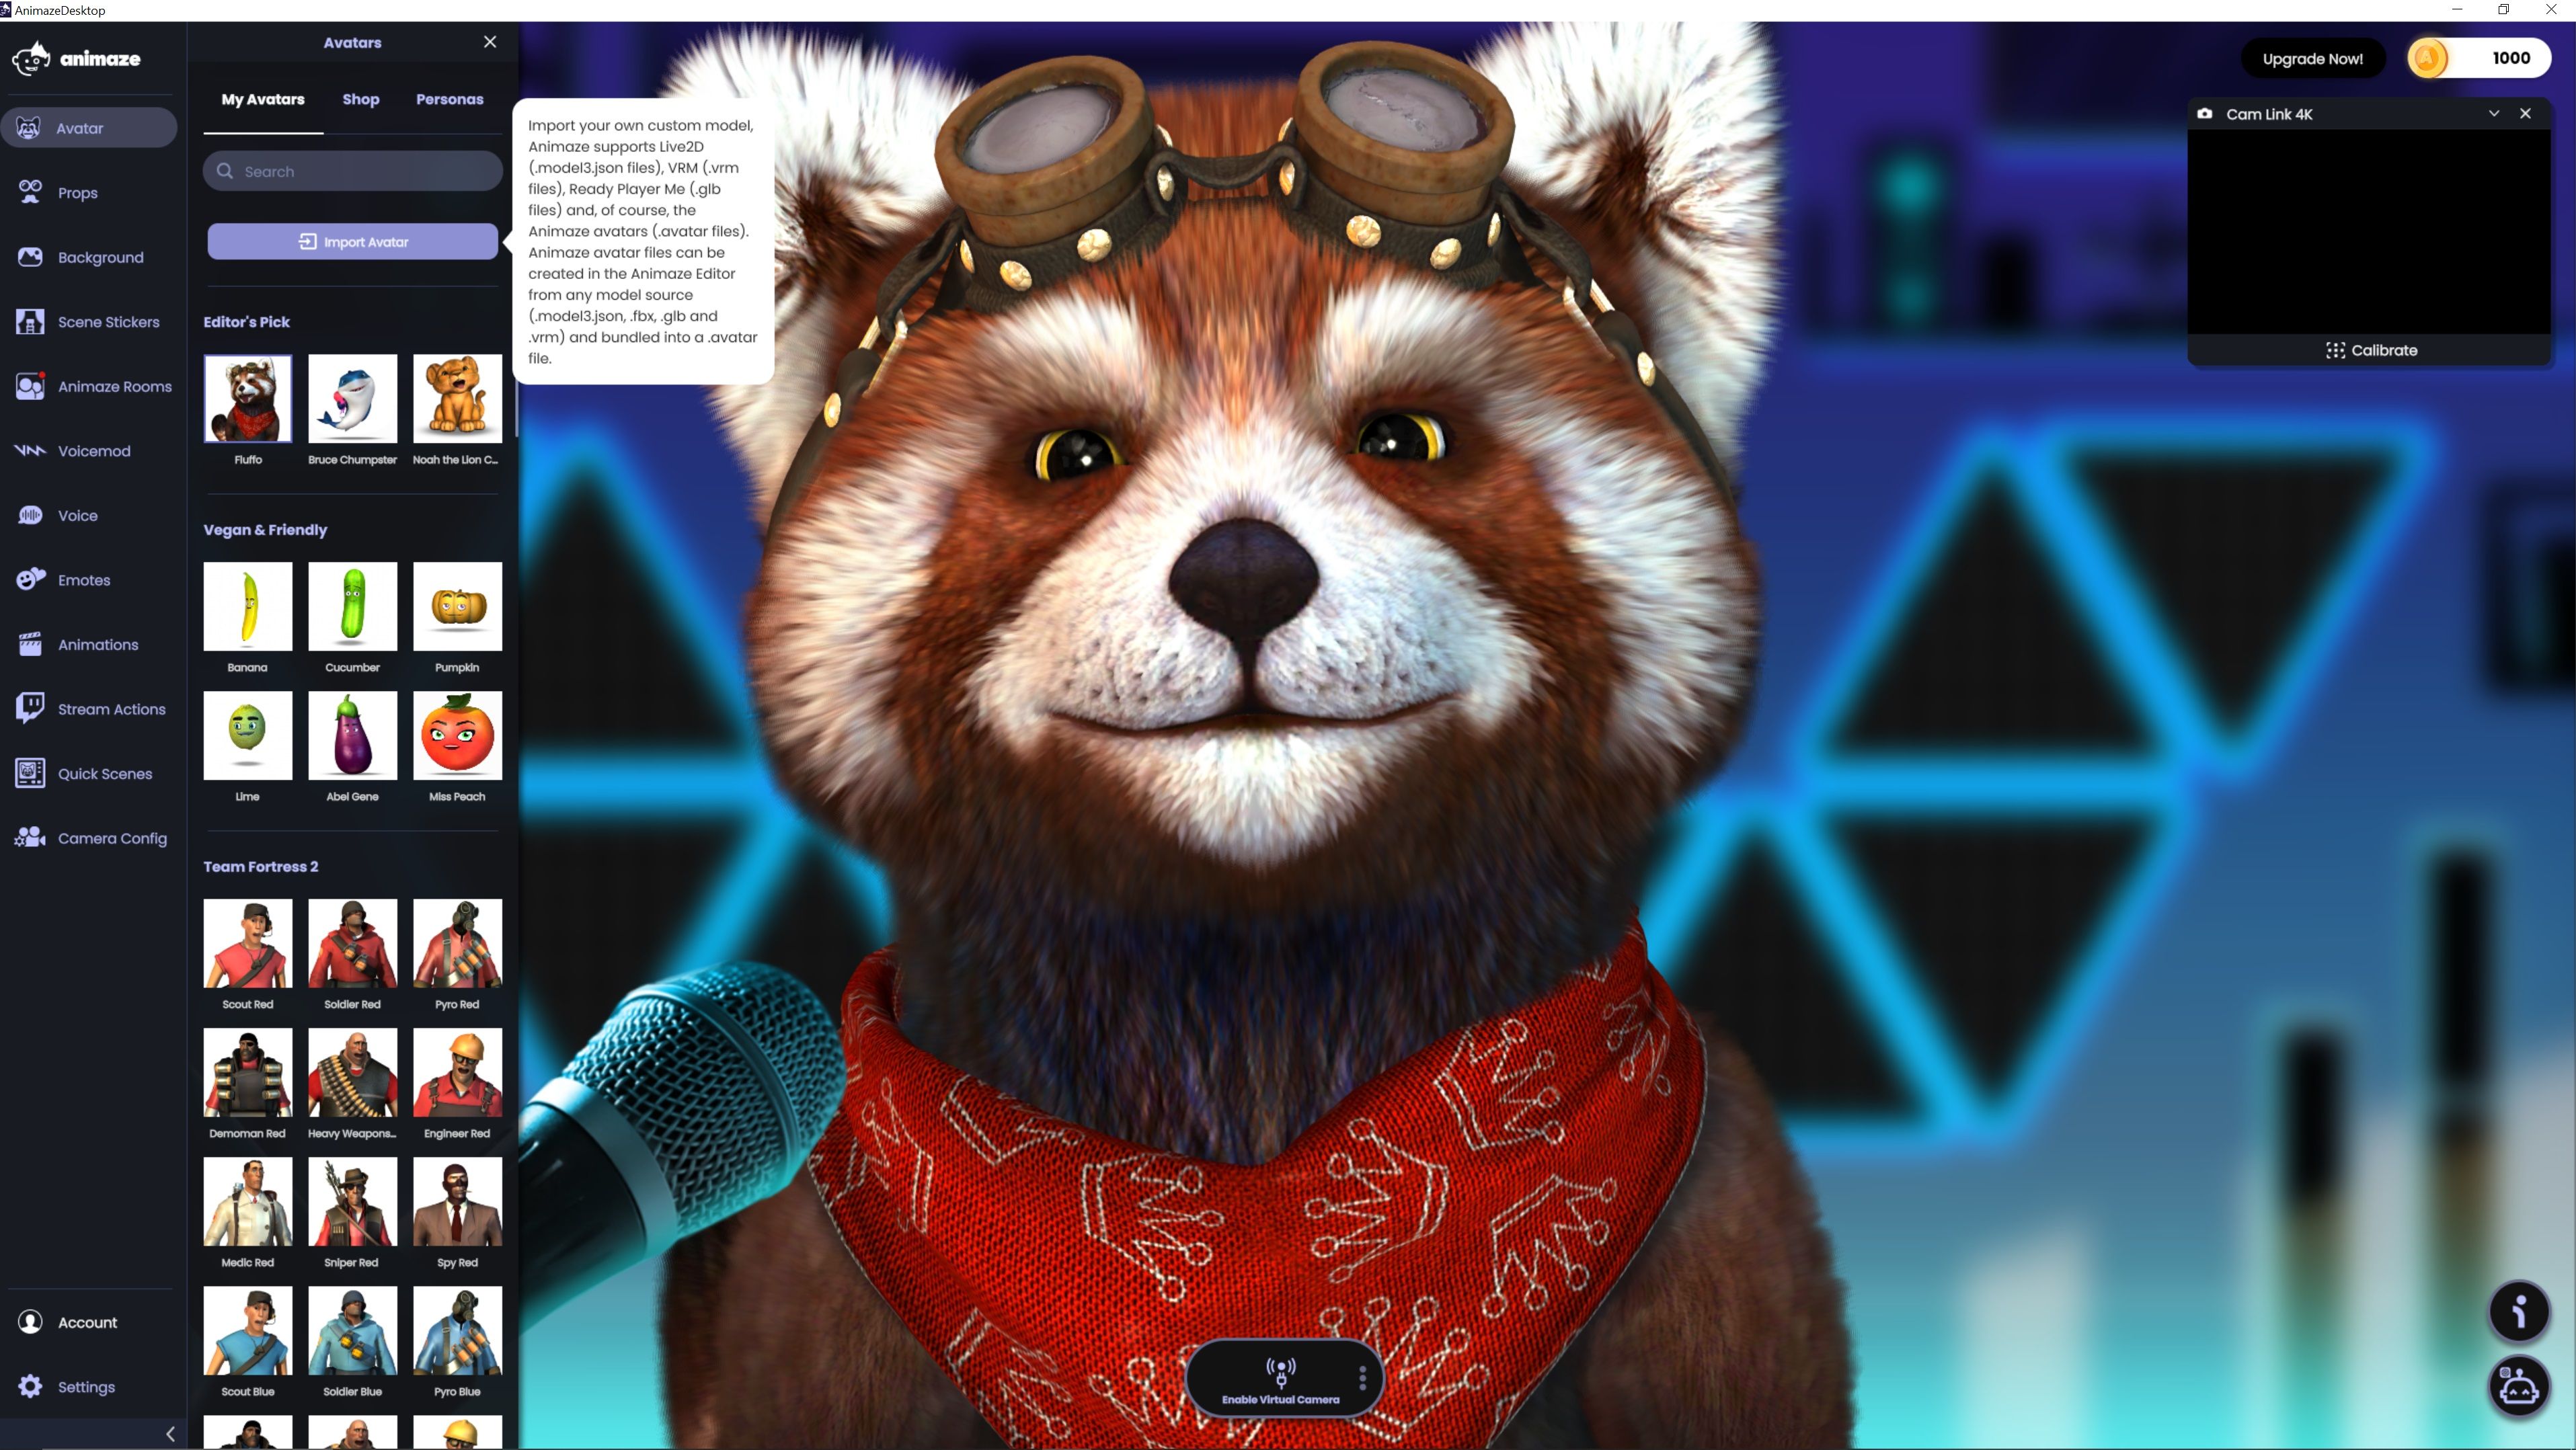
To begin, download and open Animaze. Select the Avatar tab from the top of the left-side menu and select Import Avatar. Find and select your VTuber avatar from your files.
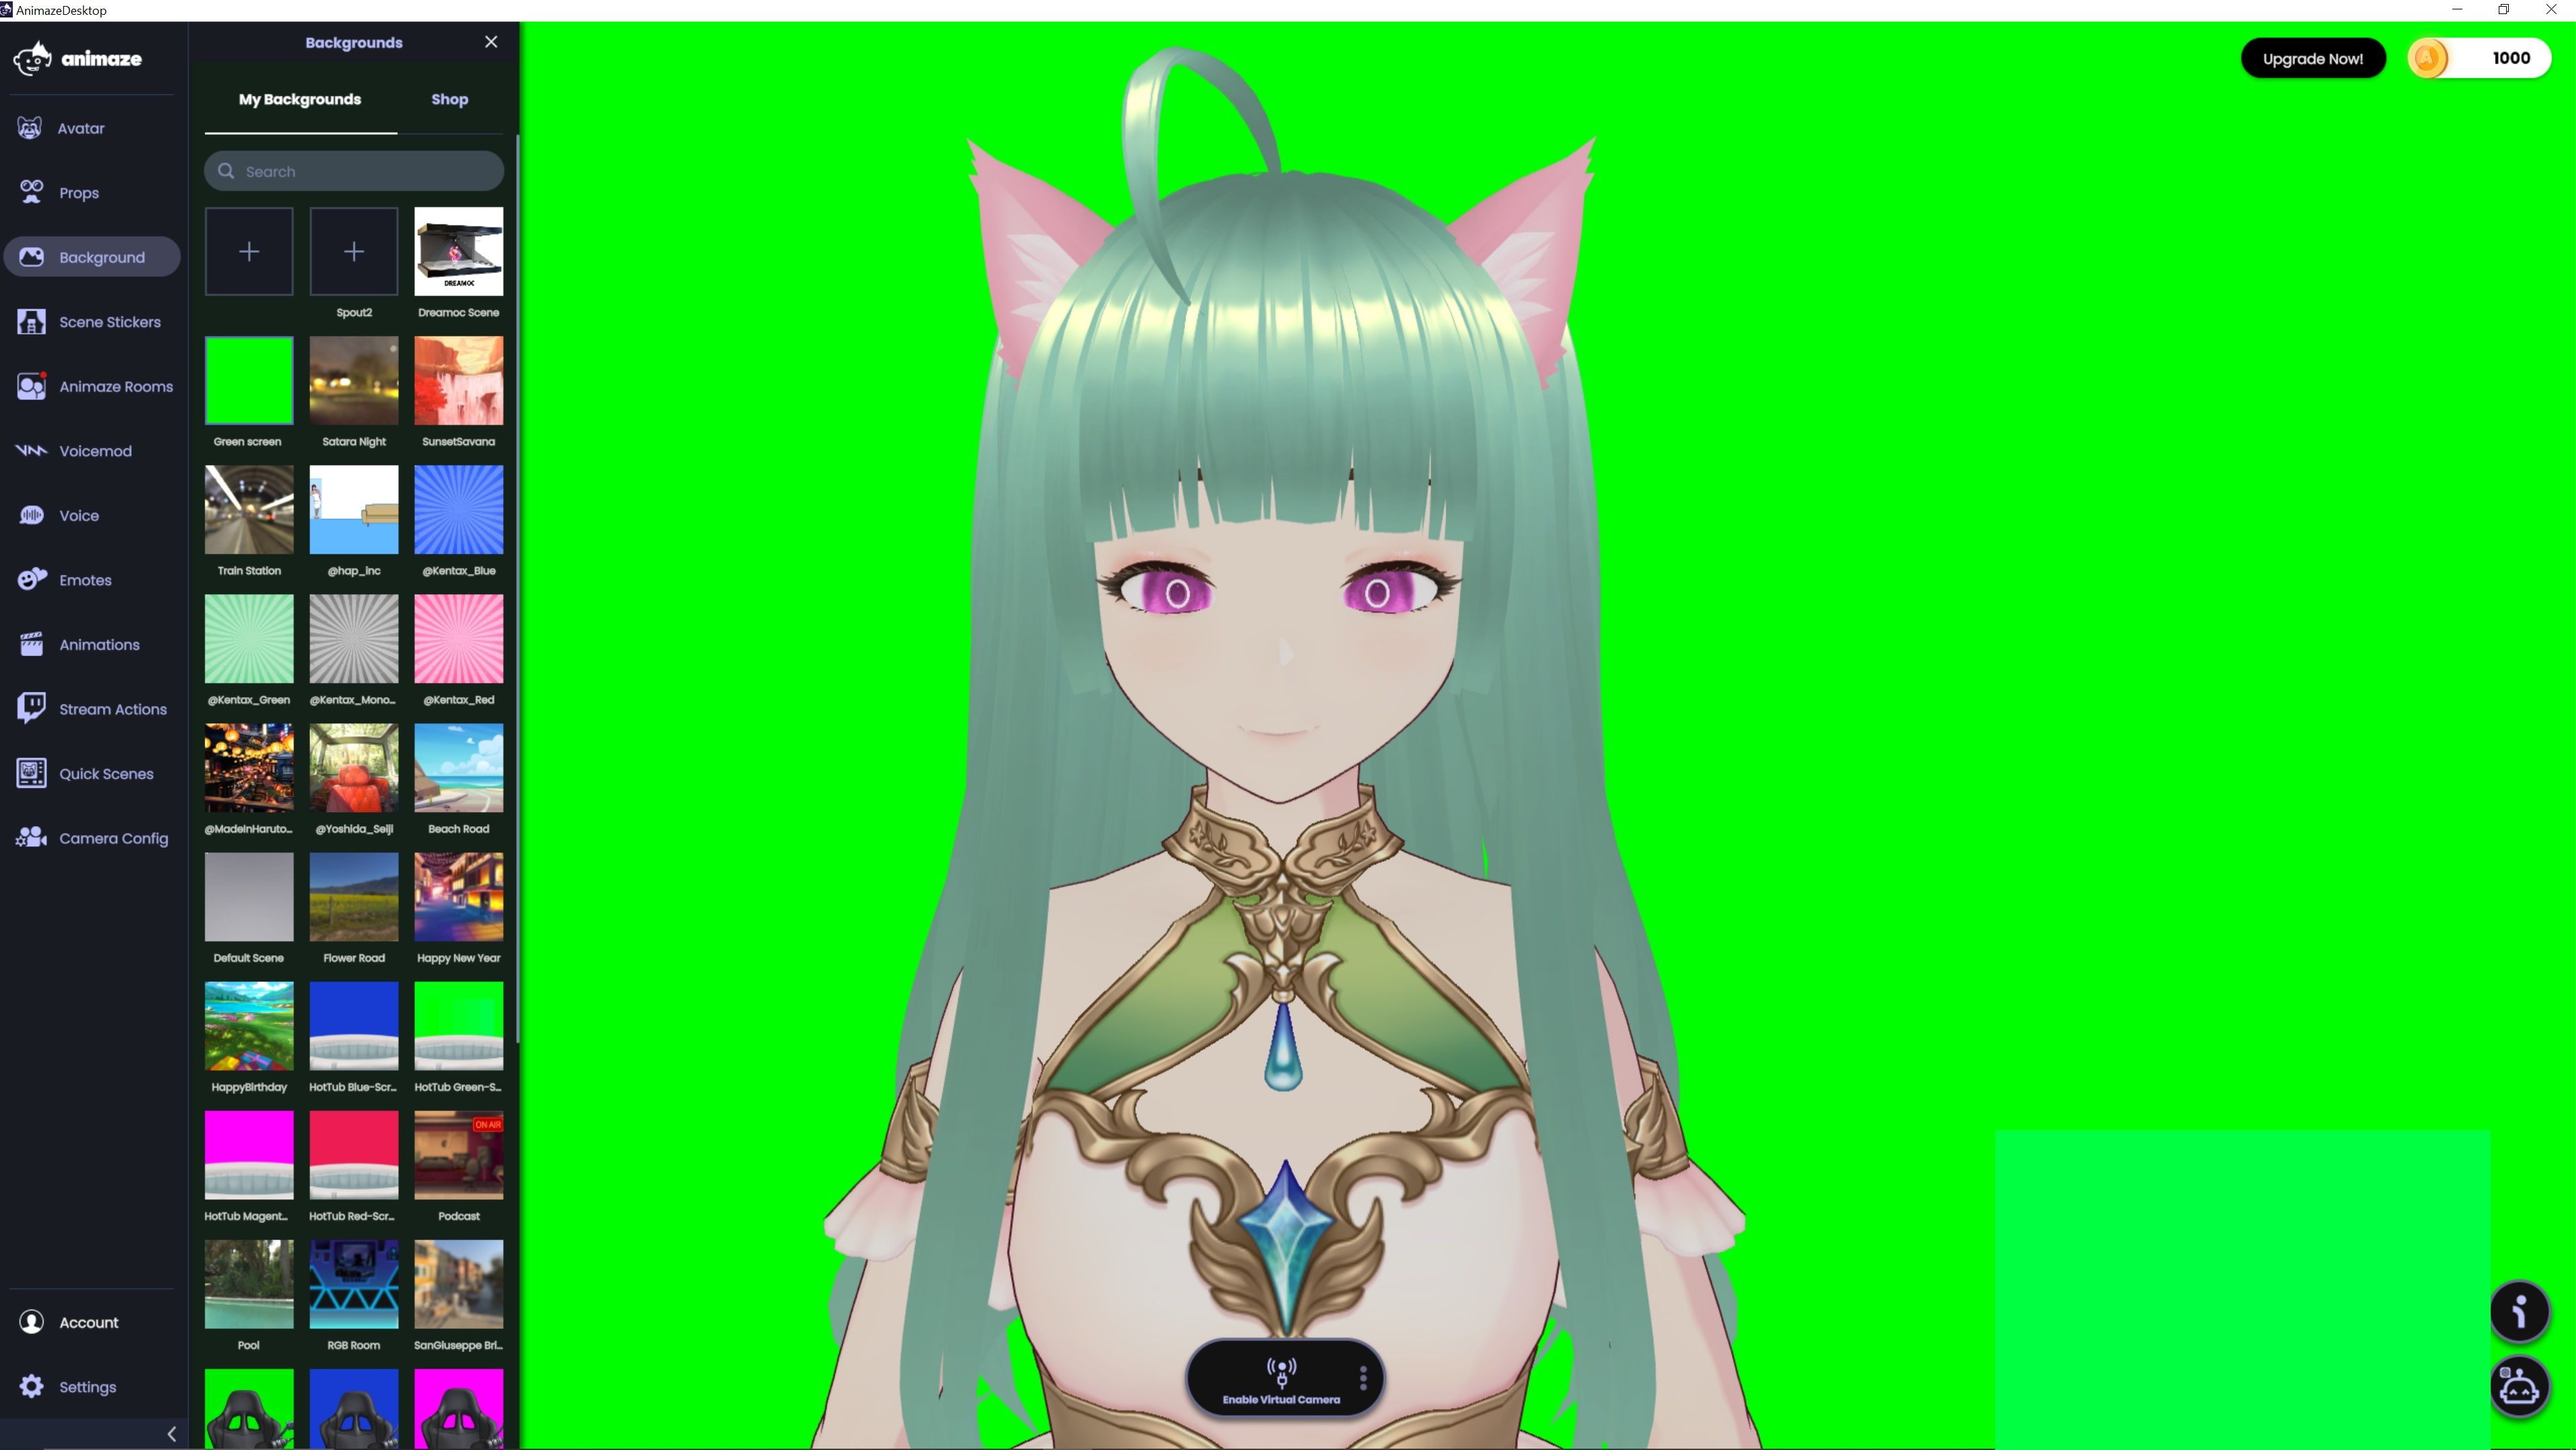
Select the Background tab from the left menu and choose the green screen background. You can select any of the available backgrounds, but the solid green option is ideal as it works like a green screen.
Select Enable Virtual Camera at the bottom of the screen to connect your webcam to Animaze. Once your picture has loaded in, select Calibrate at the bottom of the webcam window. That will sync your movements to the movements of your VTuber avatar, allowing it to smoothly follow your actions.
6. Add Your VTuber Avatar to Your Streaming Software
Now that you’ve created and set up your avatar, the only thing you need to do is import it into your streaming software and start streaming. There are many different streaming software options, but in this example, we will be using OBS.
Download: OBS Studio for Windows, Mac, and Linux (Free)
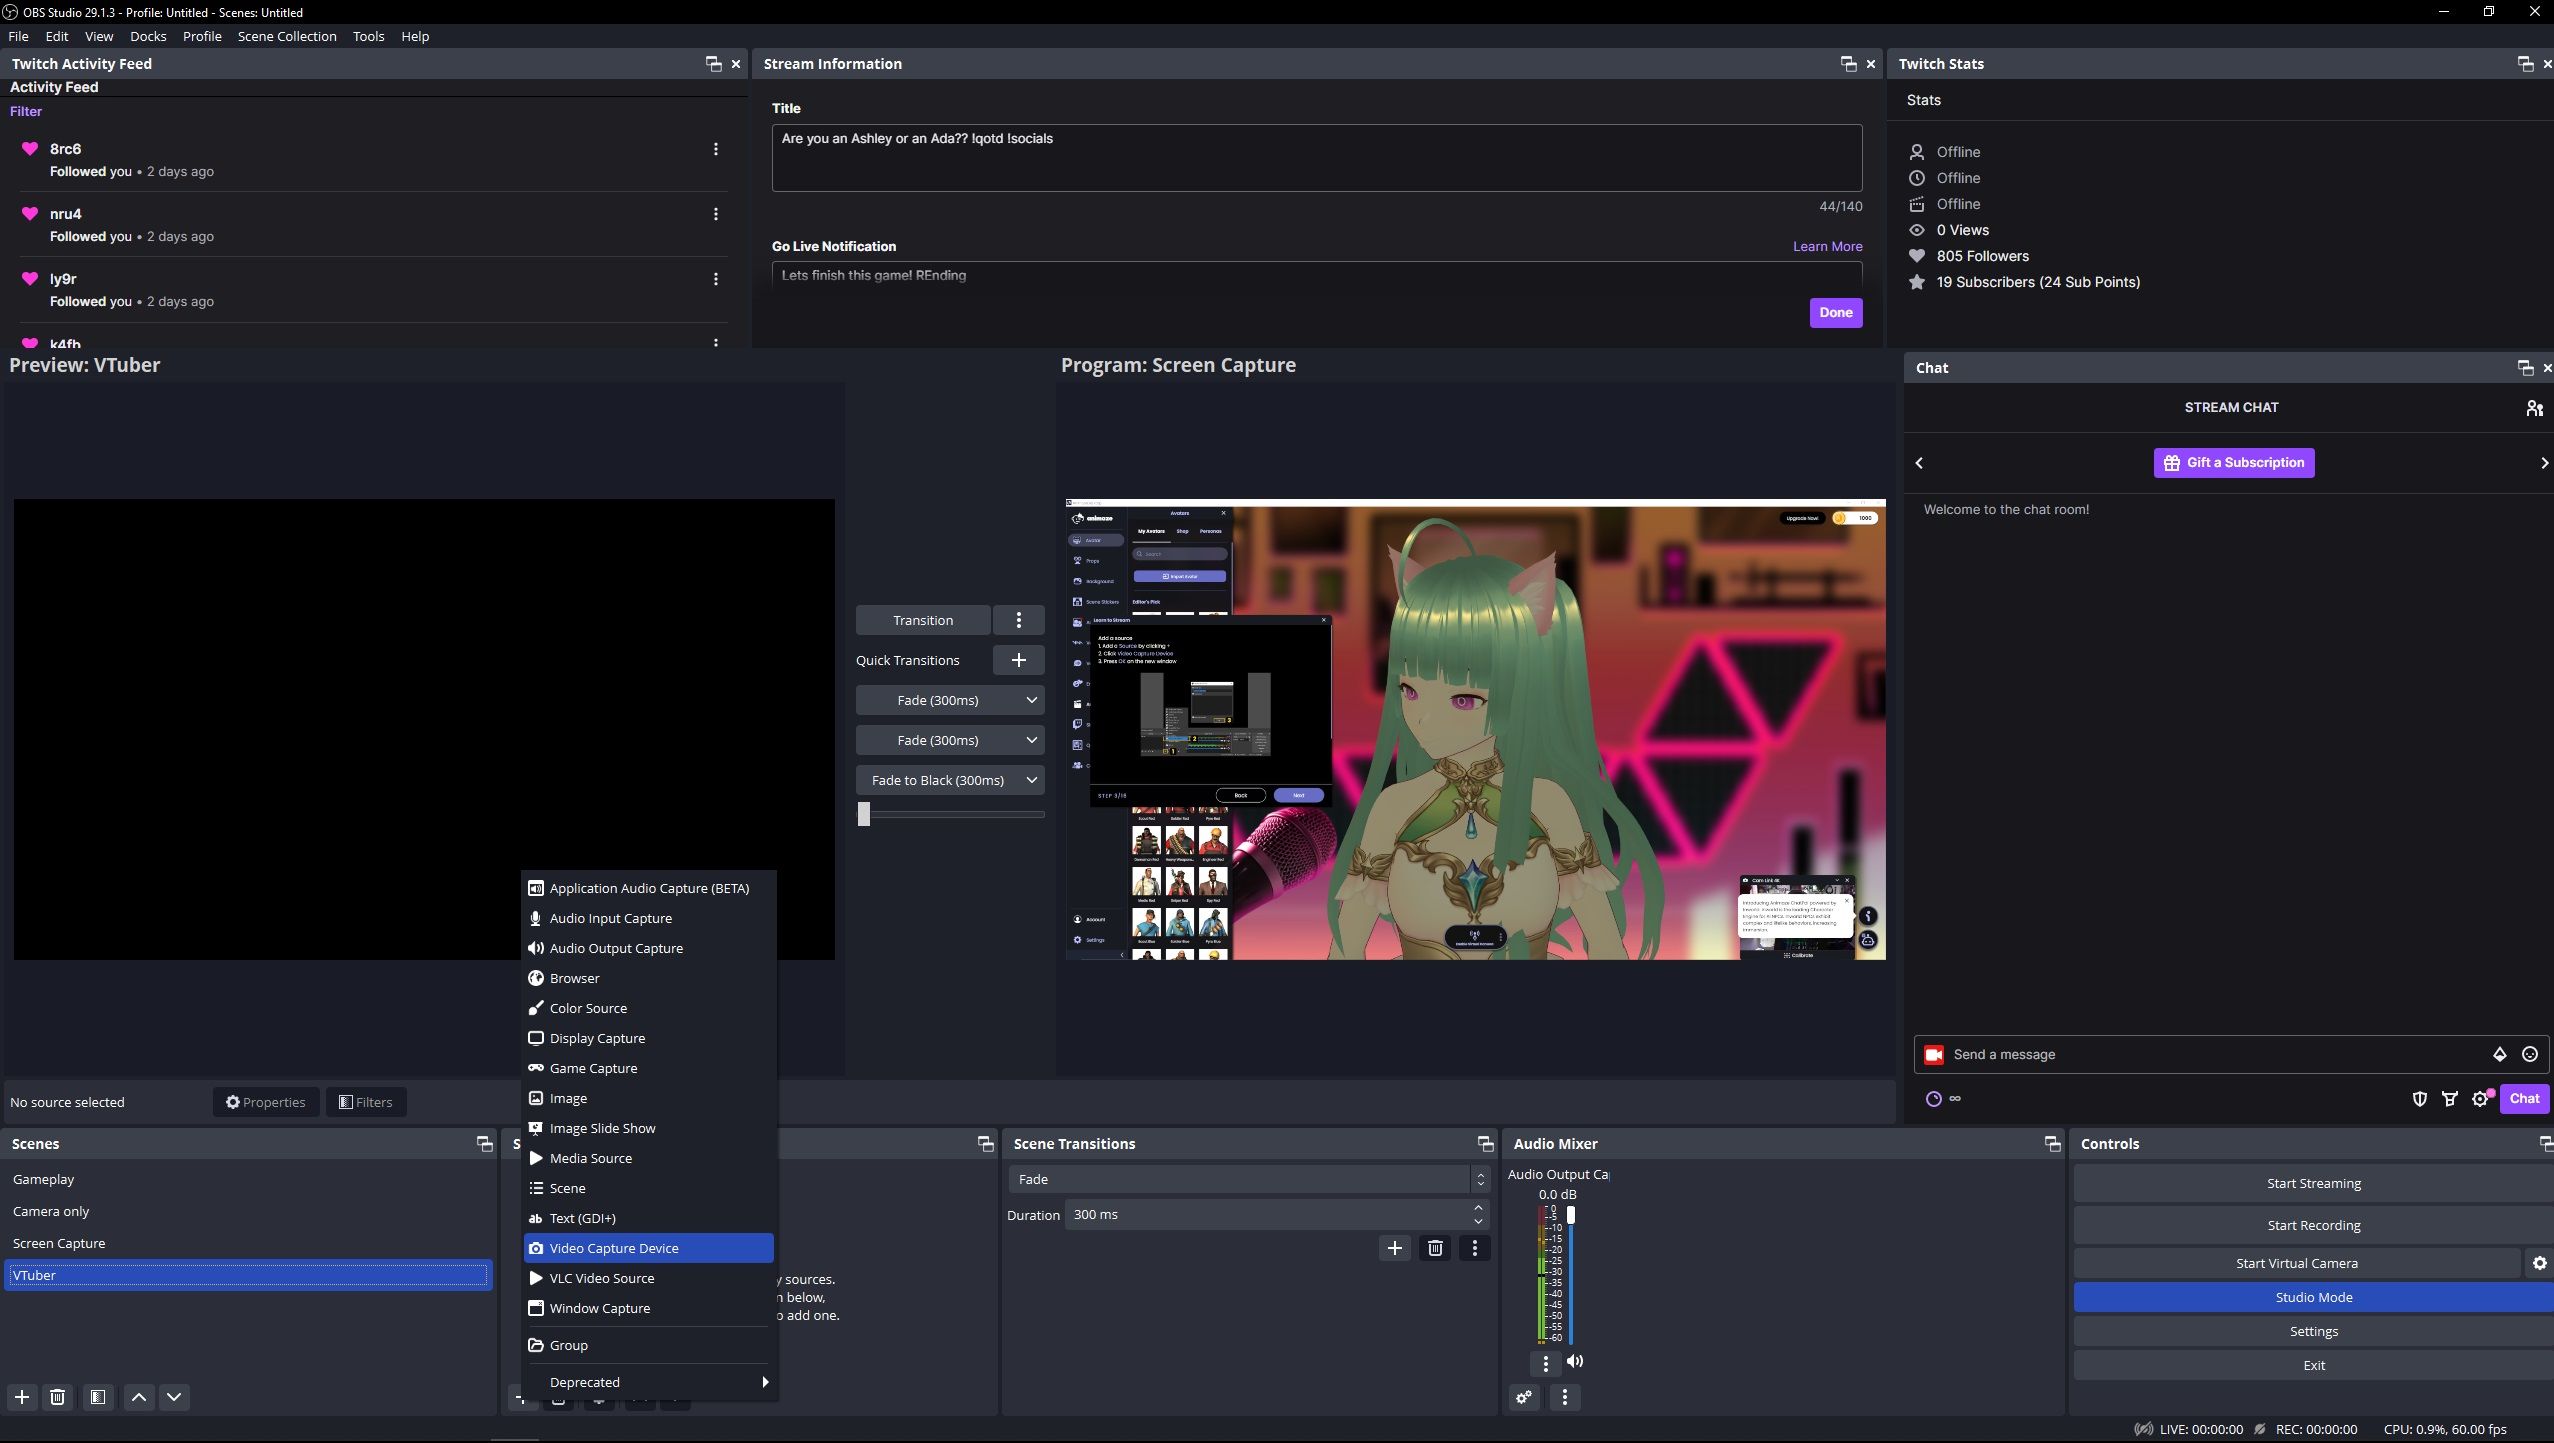
Open OBS and press the plus icon in the Sources section to add a new Video Capture Device. Select Animaze Virtual Camera from the drop-down list and hit OK.
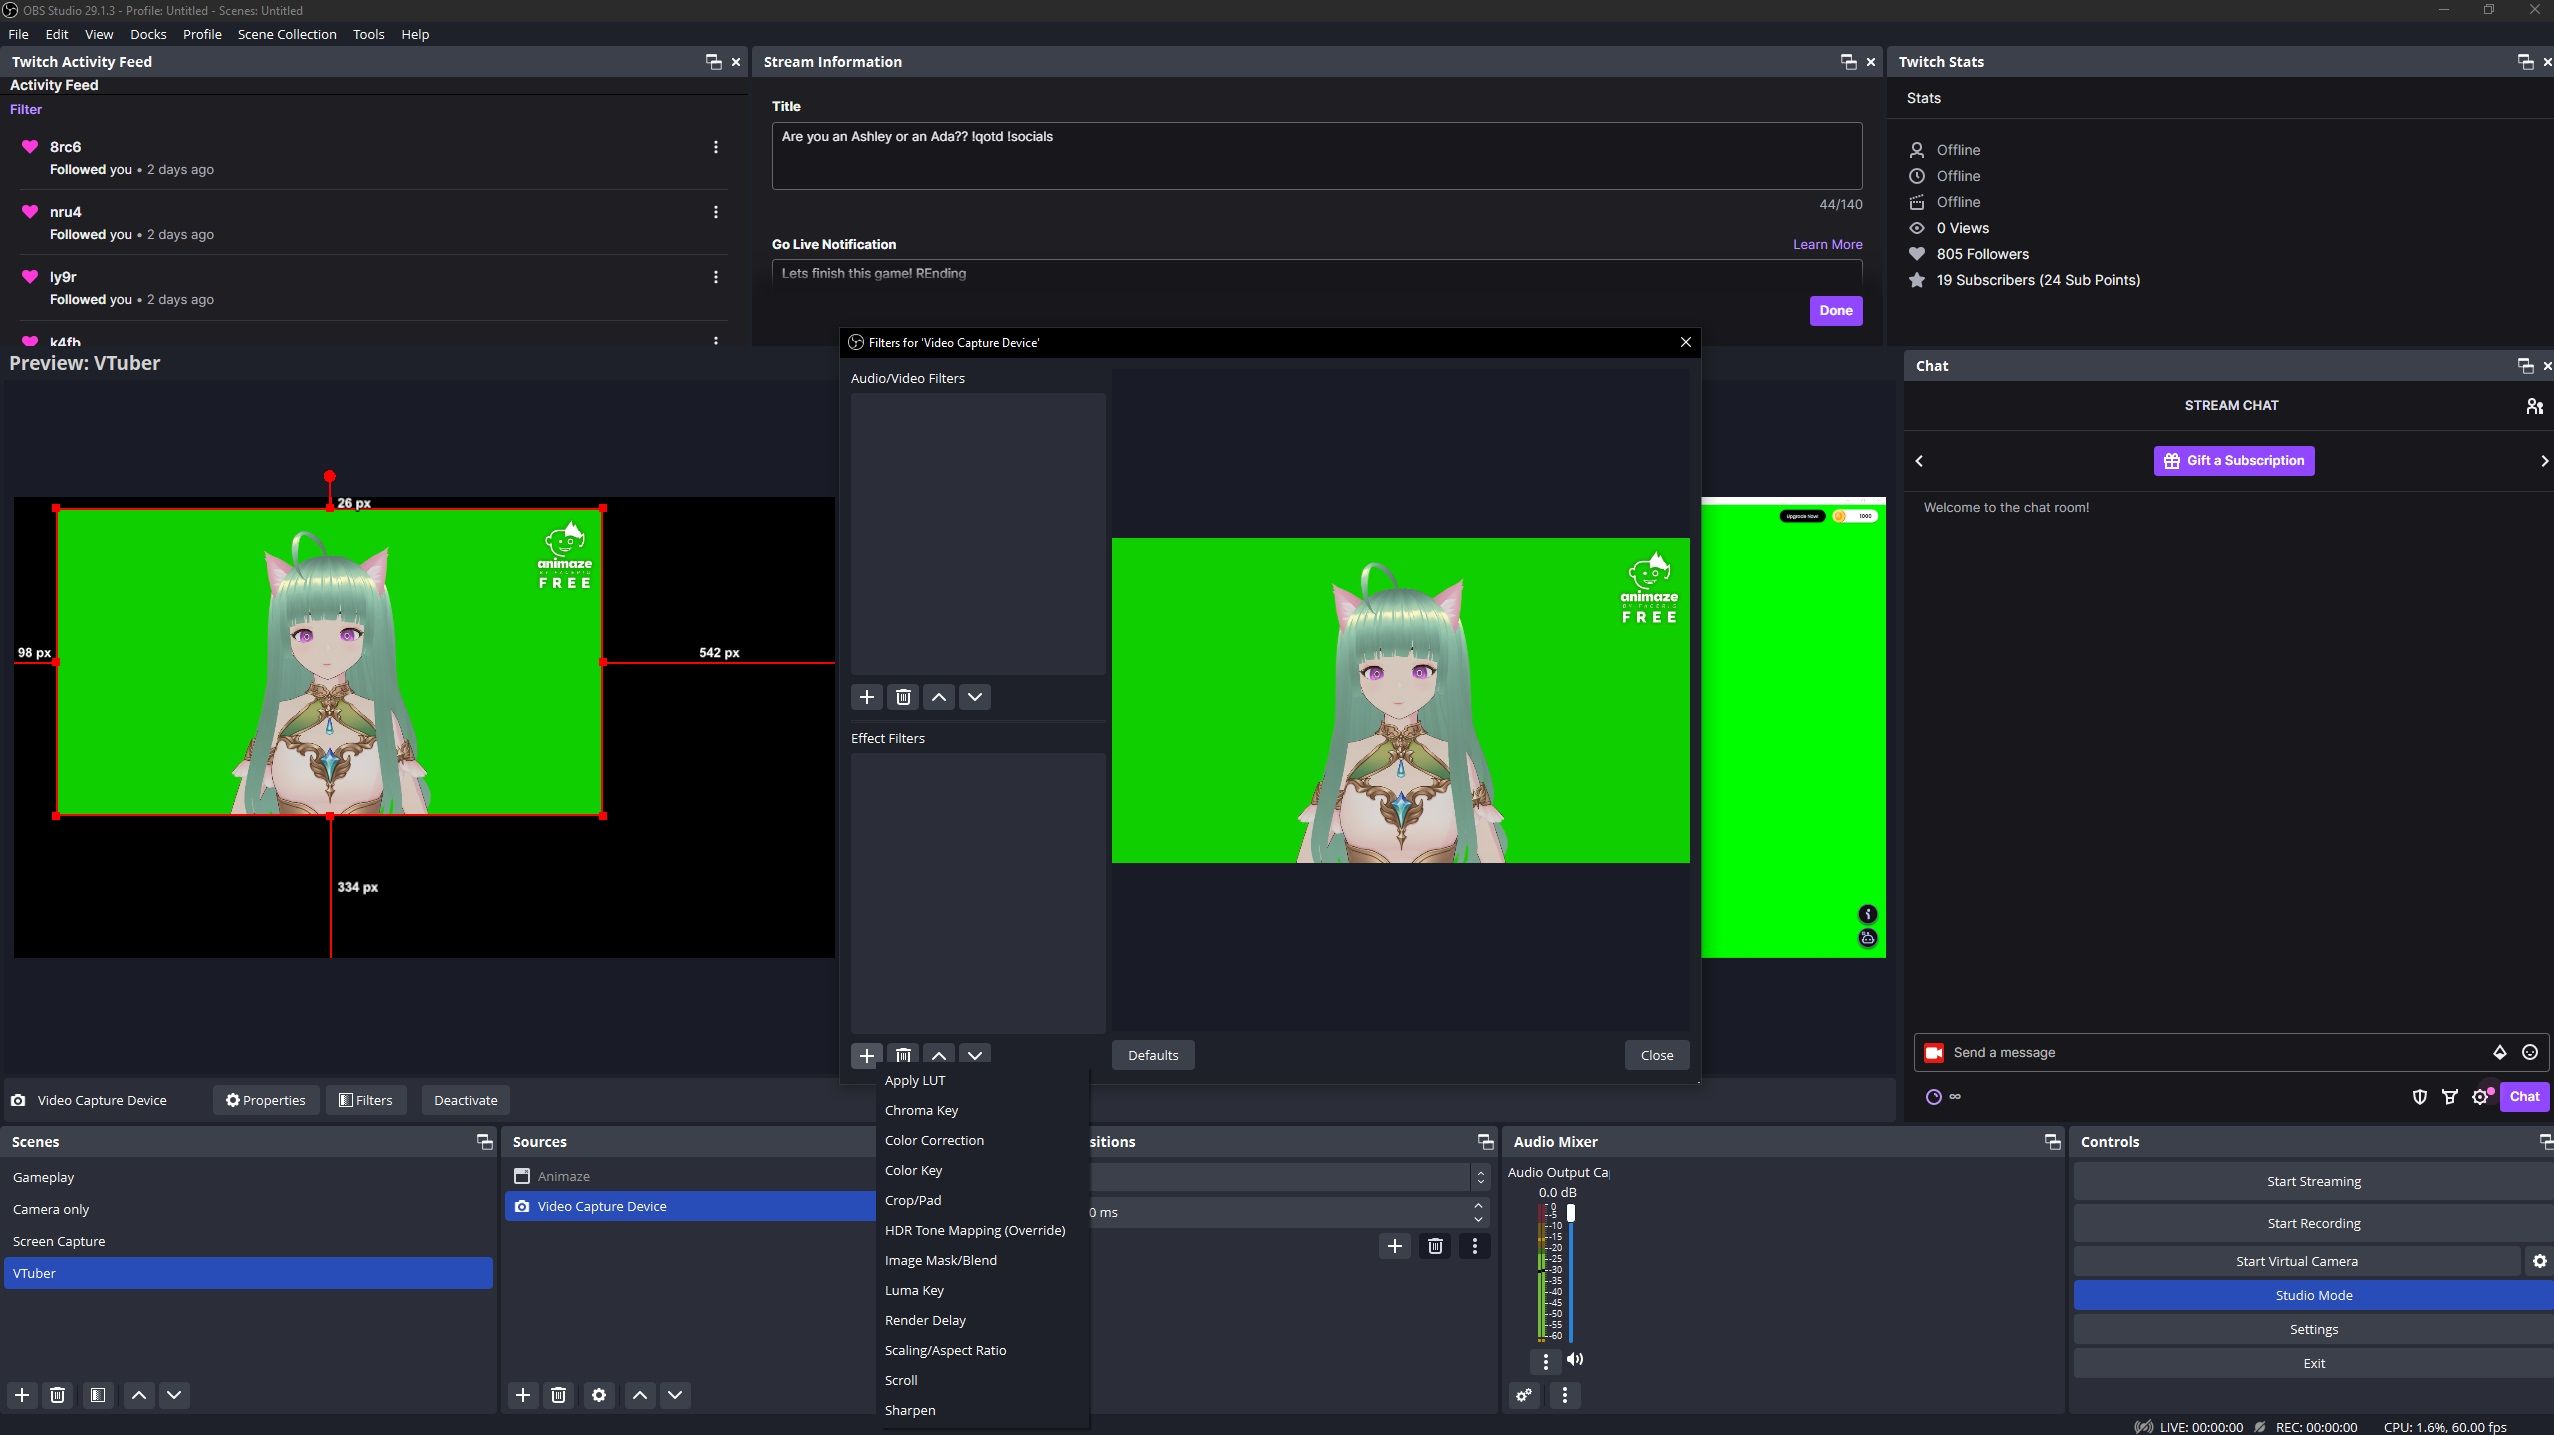
Right-click on the Video Capture Device in the Sources section and select Filters. Select Chroma Key to make the green screen blend into your stream background.
The free version of Animaze does add a watermark to the side of your avatar that moves from side to side to prevent you from simply cutting it off. There is, however, a way to crop the watermark off if you want to remove it from your stream.
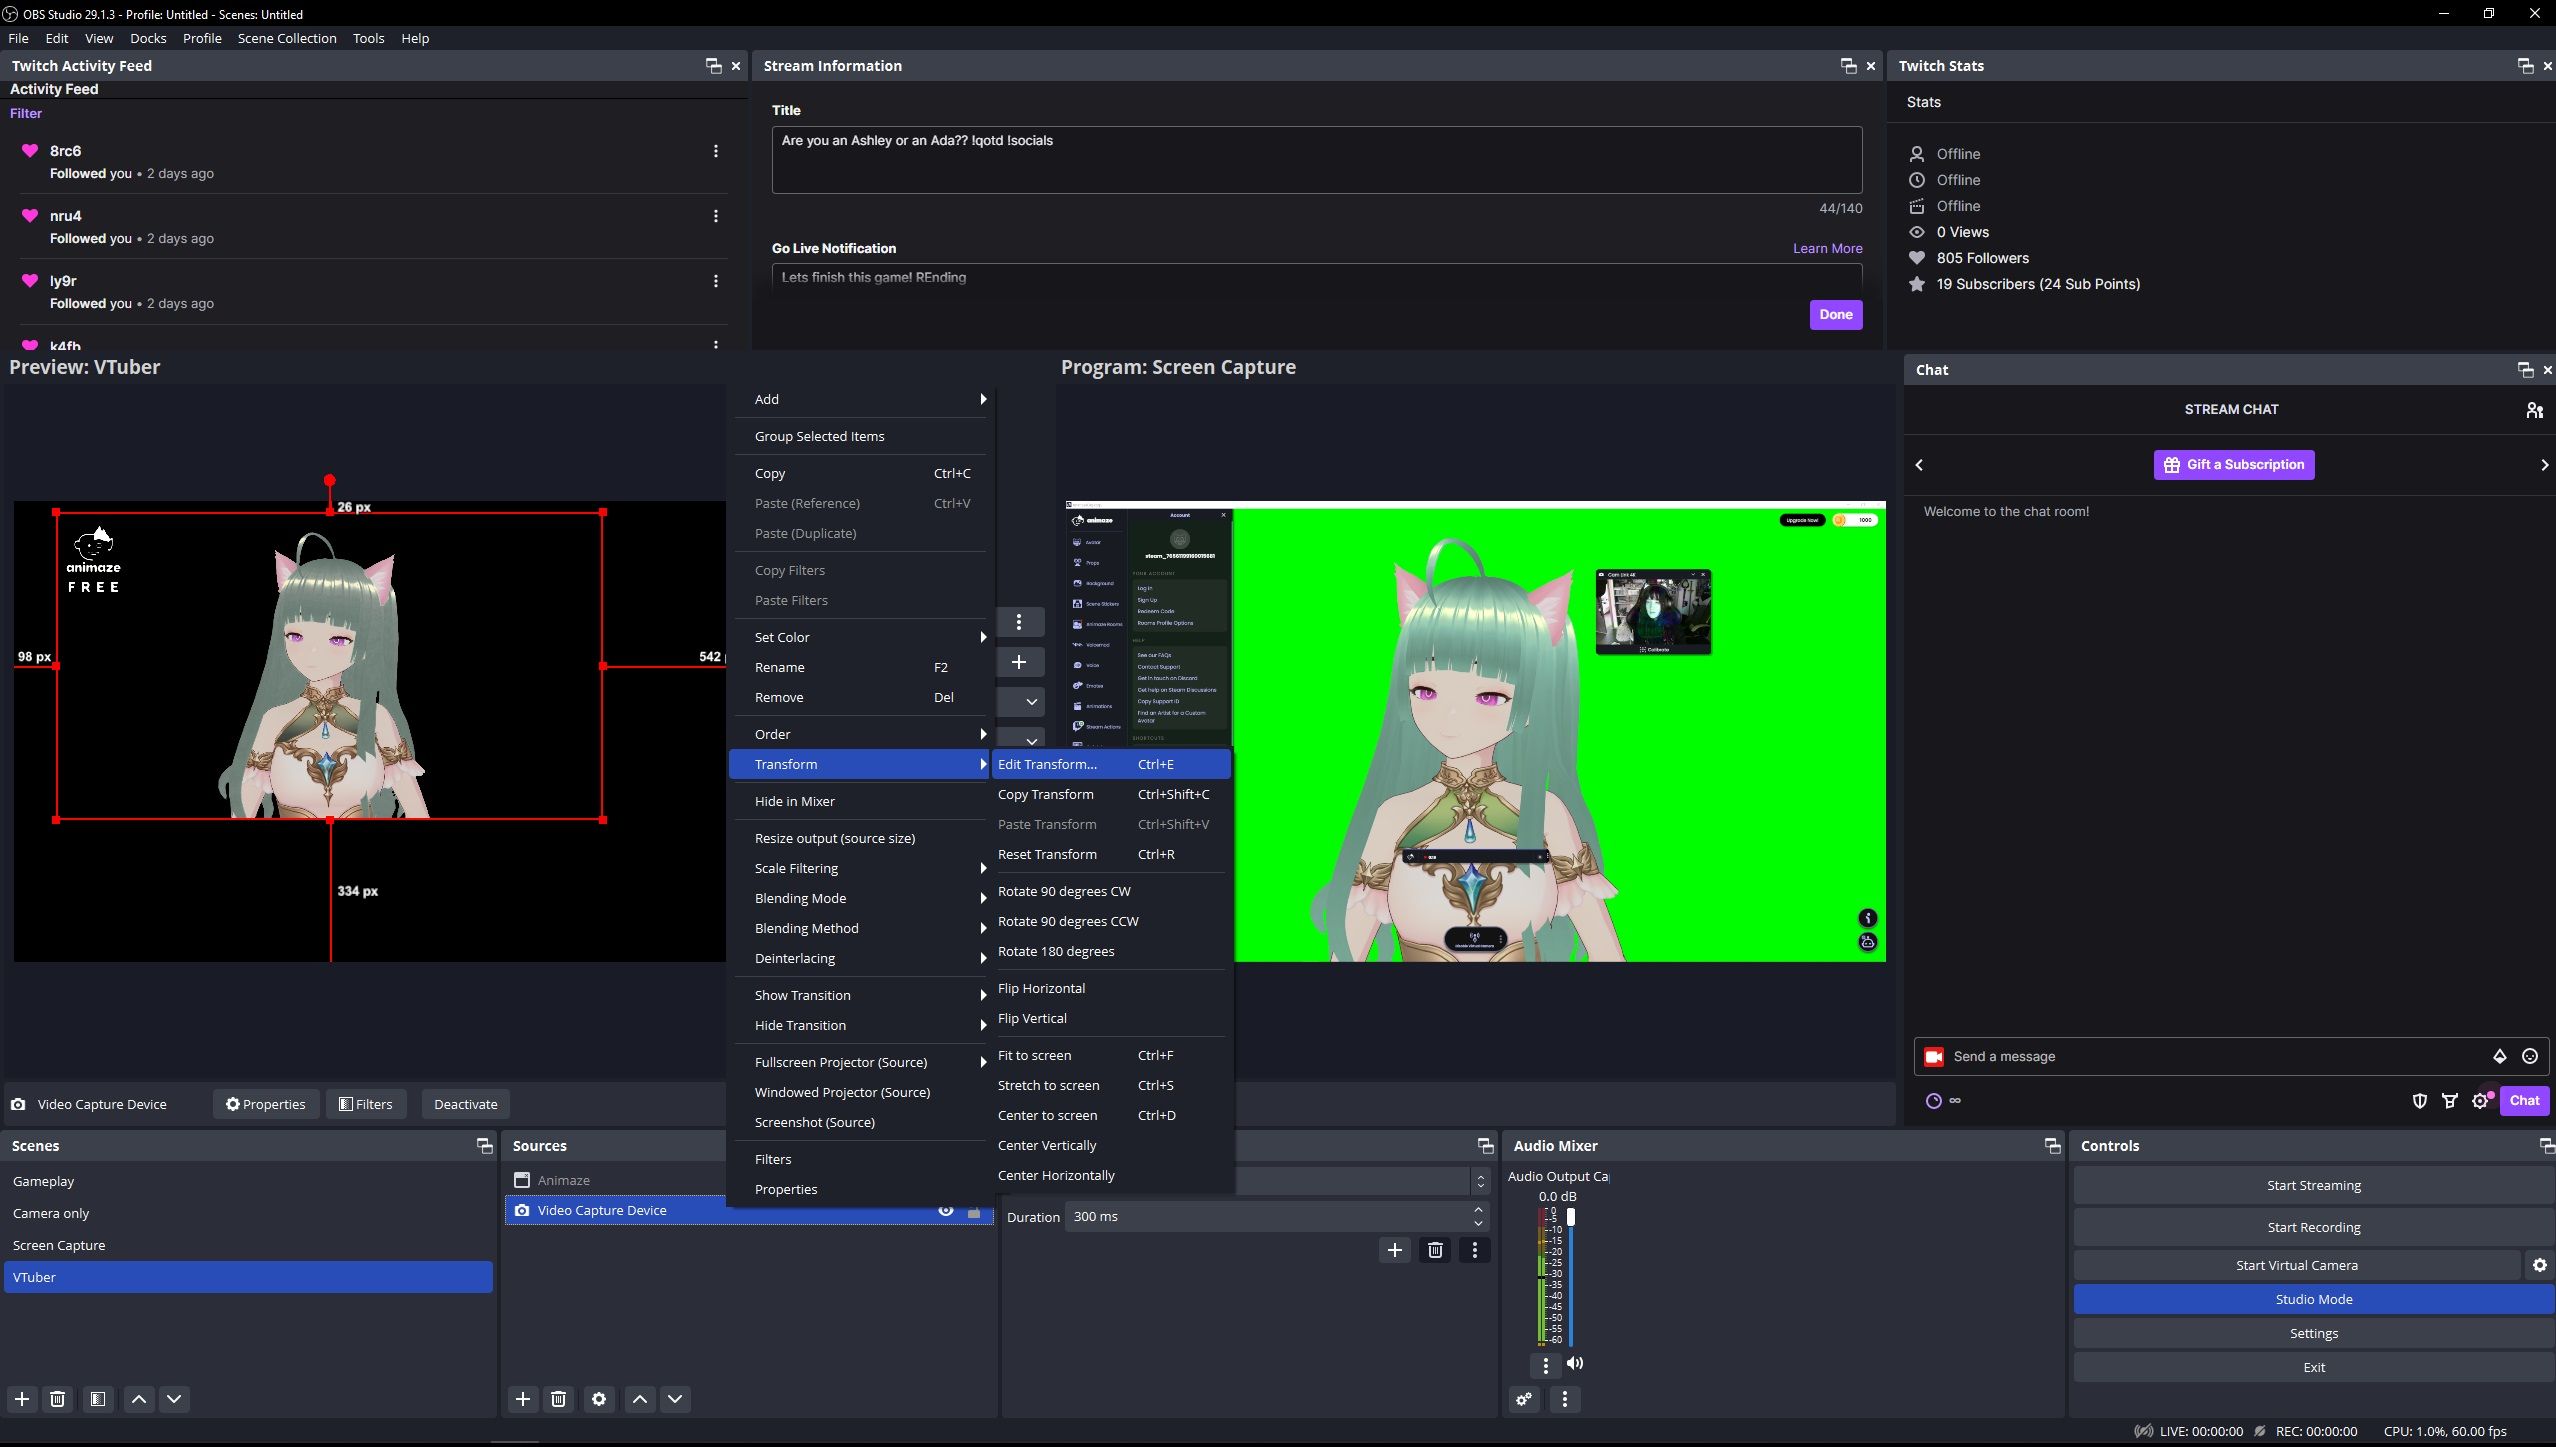
To crop the watermark, right-click on the Video Capture Device once again and select Transform > Edit Transform. Near the bottom of the Transform menu, you will see a Right Crop and Left Crop option. Select both and set the value to 154 px.
You Don’t Have to Sacrifice Your Privacy to Stream
Creating your own VTuber avatar is a reasonably lengthy process that can be overwhelming, especially if you’re not sure what programs or software to use. But hopefully, this step-by-step guide has helped you create your own avatar, so you can begin your streaming career while still keeping your identity private.


